Sunday, 15 July 2012

New Nail Design (Flower Manicure)

Hey Guys, I changed my layout since some of you guys thought my blog layout was weird. So give me comments on what you guys think. Anyway, I did a new nail art design. Simply by using konad stamping art and the new OPI Outrageous Neon Minis. So here are the pictures so enjoy. =)
Items I used in my Manicure
  1. Poshe Nail Strengthening Base Coat
  2. Orly - White Tips (French Manicure Polish) *2 Coats* Main Colour.
  3. Konad Stamping Plate M54 with Konad's Black Special Polish (5ml)
  4. China Glaze - Pool Party (Neon Pink Colour) for one of the flower petals. *use a toothpick, dotter or a find paint brush to colour in the petals.
  5. OPI Outrageous Neon Mini - Formidably Orange and Seriously Purple *like step 4 colour in the petals in which ever colour you like* for me since I can't make a decision. I just coloured in both colours alternating from each finger. (e.g : coloured orange on my 4th and index finger and the rest is purple.)
  6. Allow the layers of polish to dry for a few minutes (prevents the colour from smudging) before going on to step 7
  7. Apply Top Coat (Poshe Fast Drying Top Coat)
And Your Done

That is the pattern I used in the M54 Konad Plate. The two flower design below the butterfly design.
 Finished Design

Both My Left and Right Hands...I am Left handed so My right design looks better. Right hand (top) Left Hand (bottom)

Picture created by the Fuzel App. I love the Fuzel app by Not A Basement Studio. They also created the Manga Rock 2 app. if ya interested in manga.

Monday, 9 July 2012

first attempt at making Mac & Cheese from scratch =)

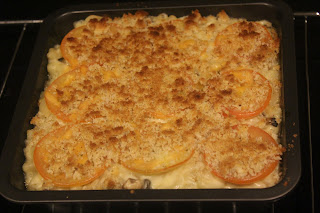
Hie all... I am back with food stuff =).. these time i made Mac & Cheese from scratch while following the recipe from the sorted food website. Mac & Cheese (Sorted) <-- Click the website for the recipe, ingredient and a video on how to make it.  I followed the ingredients and how to make it.. but I did not really follow the measurements at all. I just made it as i like it. And I added diced portobello mushrooms pre-cooked with butter before adding it to the mac & cheese. And I only used Mozzarella cheese and red cheddar. It was kind of tasteless so I added salt to season. Pictures below.
 Mac & cheese in the oven. 
 After it is done.. 
A Scoop on the plate 
Combined picture using the app called fuzel. 

Thursday, 5 July 2012

Baking with cousins and some random nail art

Hie all, I have bought more baking fun and nail designs for you guys. First off, my cousins came to bake with me =). We made strawberry short cakes and what I like to call lazy sugar cookies. You would know why i named it like that in just a moment. Below are the pictures so enjoy. =)
 Sift the plain flour, salt, baking power and sugar in a mixing bowl. 
Then slowly add the cream to form lumps after that just use your hands (after you wash them of course ) to make it into a dough. Make it into a 15 cm log and cut it into round shapes. or like us, we used our hands to make it round.
 put your round shapes in the pan, and sprinkle some sugar on top. 
and bake it in the oven as you can see the baking power cause the shortcakes to rise.
After a few minutes and they are ready, or until light golden brown. I kind of over bake them here a little. 

 time for the filling. Strawberries, main ingredient. if your strawberries are not in season yet or a tad bit sour. Just put them in a bowl and add sugar and let it rest. The sugar will allow their natural sweetness come out. Anyway, for the filling, we cut up 45 grams of strawberries. 1/4 of those cut up strawberries were mixed with 3 tablespoons of icing sugar and mashed together. while the remaining strawberries were added to make this strawberry filling.  ( as seen above)
Next whisk whipping cream, as much as you like it doesn't matter, into soft peaks.

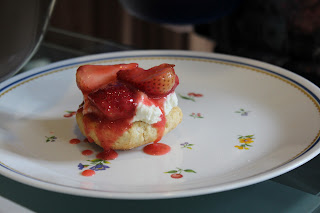
 After that is done, its time for the assembling. =) Take a shortcake, add the whipping cream on top and add the strawberry filling and top it off with another shortcake.


and there you have it. Our very own strawberry shortcake. not really that appetizing. but it still pretty and it tasted awesome. 


Okay, its time for me to tell you why i named it lazy sugar cookies. Well, since we were really tired. this sugar cookies from cutting them to heart shapes only.
 turn to using any other cookie cutter we had =P
after cutting awhile, we became even lazier so we ended up adding chocolate chips to the batter and spreading it out on the baking sheet as shown. 
 And the finished product, end up being chocolate chip sugar cookie bars =)
Onwards to the nail polishes. I Bought 3 more polishes to try out. they are cirque (Ophelia), A-england (Dragon) and cirque (Potosi)

some designs.. i tried out. from left -> different sized neon dots over a pearl white base, the recent craze of cavar nail art, i tried using my own micro beads ( it did not turn out that well), and some random nail art.  (below pictures are just some random nail art) To be honest i have no idea what i am doing. So forgive me for not putting any descriptions. 


Wednesday, 4 July 2012

My Version of a Japanese Lunch =)

Hie all, I am back again...these time i have my version of a japanese lunch..with onigiri known as the rice ball. The authentic rice ball uses only rice and sour plum at the back. But now in the modern days, you could put just about anything inside the rice ball. from salmon to wasabi (only if you are trying to trick your friends into eating it =p) Here are the pictures hope you enjoy. Today, I am using button mushroom and rice seasoning for the rice as for the filling, it would be crab like the dodo brand crab sticks but i am using real crab instead.
Step 1 -> Cook the rice. It has to be the japanese short grain rice. probably found in the rice section or the japanese section in your supermarket.
 Step 2 -> prepare the mushrooms, you can use any other type of mushrooms as long as it is cooked. cut them into smaller pieces like it is shown below.

Step 3 -> prepare your rice seasoning...i have forgotten what this seasoning is called but it has seaweed, fish flakes and sesame seeds inside. 
Step 4 -> mix the rice seasoning and mushrooms with the rice as shown above.
Step 5 -> making the filling, I just use crab and japanese mayonnaise. 
Step 6 -> once it all done and you have all the ingredients assembled and the right tools (shown below) You are ready to make your very own onigiri... Ps : if you don't have the onigiri maker below, you could always use your hands but remember to have a bowl of water next to you (dip hands first before handling the rice, its to prevent the rice from sticking to your hands) and wash you hands before making =)

 The making process can be a bit messy so I would just show you the finished product. enjoy the pictures. =) they are too adorable to eat =0 but when your hungry, anything goes. 


 Don't they look like a family eating =p
Combine it with a bowl of miso soup and you got your very own japanese lunch. =)